

Does Ableton Compressor Add Makeup Gain
Desire to learn how to brand dubstep?
Whether y'all want to make tearout brostep similar Skrillex, or deep dubstep like old-schoolhouse Skream – it seems so confusing to brand. Especially when it comes to audio design.
Don't fear – in this guide, we'll embrace the unabridged product procedure of a dubstep track. Along the way, there will be plenty of creative options to have things in your own management. We'll go over:
- How to nail the simple half-time pulsate pattern that defines dubstep
- The importance of simplicity
- Bass audio design tips & tricks
- Arranging your track for maximum driblet impact
- Mixing and mastering loud for the club
Let's take a expect – we'll exist using Ableton Live, but y'all tin follow forth in FL Studio, Logic Pro X, or whatsoever other DAW! 👇

Table of contents
- The Basics Of Dubstep
- Step #1: How To Brand An OG Dubstep Drum Pattern
- Pace #2: Programming in Intricate Hats & Percussion
- Basic Hat Rhythm
- Background Crashes for Driblet Free energy
- Extra Hi-hat for Groove
- Step #3: A Huge Bassline For The Driblet
- The Bass-ic Audio
- The Best Bass Notes To Use
- Post-Processing – Bring The Sound To Life
- Footstep #4: Bass Variations & Other Driblet Sounds
- Growl Bass Make full
- Spoken Vocal Cut
- Step #5: Melodic Synths For The Intro Claw
- The Arp
- The Chord Synth
- The Lead Synth
- Step #half-dozen: Arranging A Strong Intro, Build & Drop
- Intro (First 12 bars)
- Drop (8 bars)
- Pace #7: The Mail-Drop, Second Drop & Outro
- Reprise (8 Bars)
- Build (8 Bars)
- Drib 2 (sixteen Bars)
- Reprise & Outro (16 Bars)
- Step #8: Cleaning Up – Mixing & Final Polishes
- Faders
- EQ
- Bass Energy
- Carving The Arp
- Compression
- Sidechain Compression
- Drums Kiss
- Step #9: Mastering for Maximum Loudness
- That's How To Make Dubstep!
The Basics Of Dubstep
Before we get into the steps, there are a few central things yous need to know almost dubstep.
First, dubstep tends to sit down around 140BPM-150BPM and features a half-time drum design.
This ways that instead of the kick featuring on the 1 and 3, the kick features on the 1, and the snare on the 3.
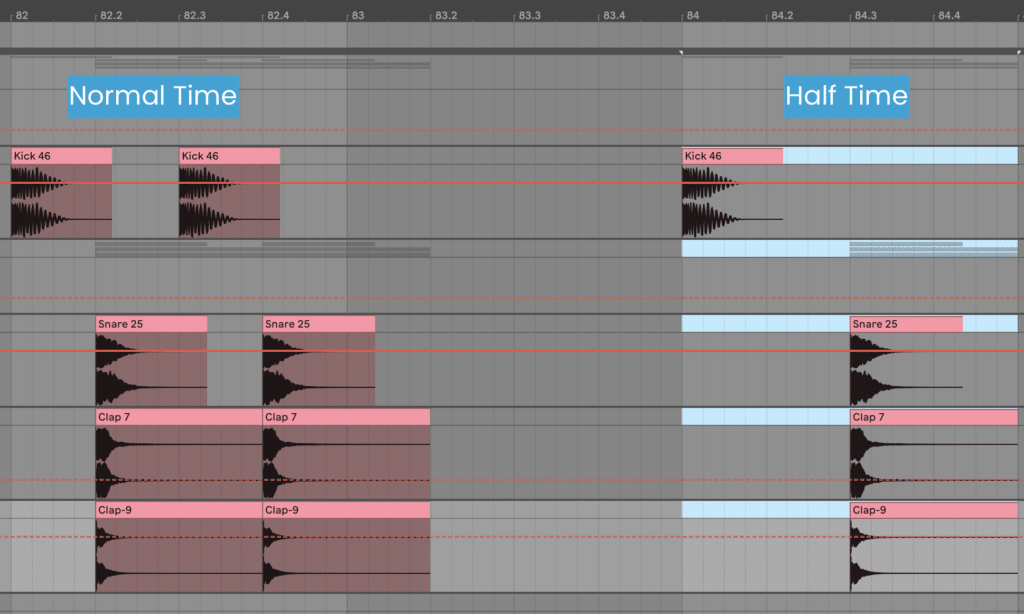
Some people prefer to define dubstep at 70BPM instead for this reason – it'south one-half equally fast.
Secondly, as dubstep falls into the category of 'bass music', the keys tend to stick around E Small-scale-K Minor, although this is not a hard-and-fast dominion.
The reason for this is that E-1000 is reproduced well on subwoofers in clubs, making these scales ideal considering the root notes stick around this range.

So for this runway, I'll pick F# Small-scale.
Lastly, every bit previously alluded to, at that place are two 'schools' of dubstep: modern dubstep (AKA 'brostep') and traditional dubstep.
I'm no snob, so I'll be roofing both in this article, with suggestions on how to take things in either management.
Here's a quick example of each.
Mod Dubstep:
Notice how Virtual Riot uses enough of bright synth sounds and ambitious, digital basses?
Traditional Dubstep:
Compare that to the deeper sound of Visages – less aggression just plenty of sub-bass action, unique sound design, and atmospheric vibes.
With this in listen, let's start making our dubstep track! 👇
Step #1: How To Brand An OG Dubstep Drum Blueprint
Equally you might have guessed, drums are essential in dubstep. So they're normally a groovy place to begin your idea.
Now that we understand what a half-time drum pattern is, we tin start our runway off by programming one in.
Don't do what I did when I started and pick any old samples – choosing a quality kick and snare volition make the product process mode easier.
I'1000 going to select a nice kick and snare from our EDM Starter Kit. These will work well for a more energetic, modern form of dubstep.
Kick:
Snare:
You can work in either MIDI or sound for this, depending on how you normally program your drums. I'm going to work in audio as I dearest the visual workflow.
Simply drag your kick onto the start shell, and the snare onto your 3rd:
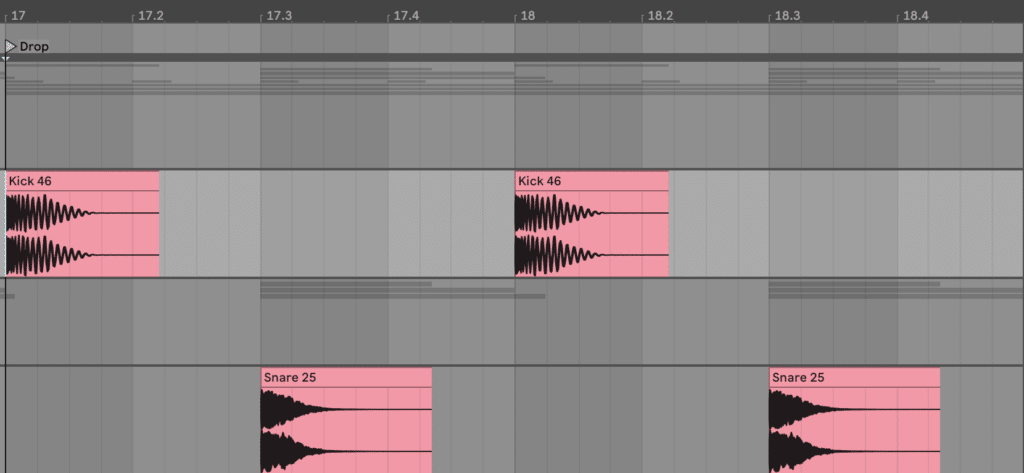
This two-bar pattern is the foundation of your dubstep track. But let'south make things a trivial more interesting by duplicating this simple loop 4 times and programming in a few kicks. I'll add:
- a second kick the beat after the 2d snare in bar ii (at ii.4)
- another kicking in bar three correct before the snare (3.two.2)
- the aforementioned kick in bar for (4.2.2)
- a kick right afterwards the last snare (4.three.2)
Here'south what y'all should get:
Now we accept a solid 4 bar loop featuring our massive kick and snare. But the snare lacks a flake of top-terminate body, then let'south layer in two claps:
Handclapping:
Handclapping Punch:
Only layer every snare up with these 2 samples and grouping them together.
Lastly, let's add some reverb to these ii layers. This volition give the snare a nice airy tail, filling in the gaps betwixt each hit.
I'grand using a modified version of Ableton Live Reverb 'High Verb' preset at 38% moisture:

With the main snare, information technology should sound something like this.
As you tin can imagine, although the rhythm is simple, the sound of your boot and snare class the footing of the entire rail. So don't neglect this step.
Side by side, let's layer this upwardly with some hats and other percussion hits.
Pace #ii: Programming in Intricate Hats & Percussion
The way yous use hats in your dubstep rails determines the overall energy level.
More Frequent Hats & More Layers = More Energy
Less Frequent Hats & Less Layers = Less Energy
Simply as with annihilation in music, simplicity is key. Don't have 10 hat layers and 5 crashes – only pick a few good sounds and run with it.
Bones Hat Rhythm
So first, let'due south find a dainty solid semi-open up hi-lid sound. I'm going to option this one from the EDM Starter Kit:
Hi-hat:
It's short, brilliant, and simple. Perfect for a dubstep track.
To start this off, I'm going to program it to striking on every beat out (i/iv note). This carries the energy of the loop quite nicely.

For more stripped back and traditional styles of dubstep, you could get out information technology hither (and peradventure use a bit of reverb to fill out the infinite). But I desire to take it up a notch.
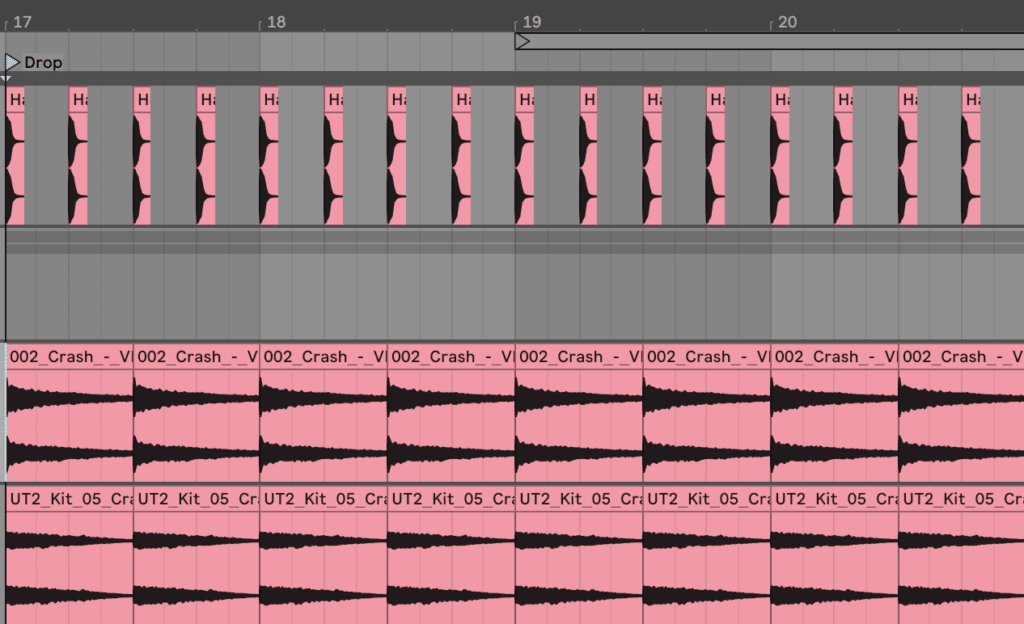
Background Crashes for Drop Energy
Dorsum when I first made dubstep, I wondered why my drops lacked energy and fullness.
And then I realized that many dubstep producers (Skrillex, Kill The Noise etc.) use crash samples to fill out their backgrounds.
So permit'south find a crash to add together on every 1st and tertiary beat out, matching up with nearly kicks and snares.
Y'all don't have to, but to go a wider sound, I'm going to choice 2 crashes from an external sample pack and pan ane thirty% left, and the other xxx% right:
Crash ane:
Crash ii:
We'll grouping both together, and turn this downwardly so it's quieter in the mix, filling out the groundwork free energy.
Extra Hi-hat for Groove
Lastly, I want to add in another lid audio to create some groove on the 16ths, equally things are pretty 'direct' right at present.
Hi-hat ii:
I'thousand going to apply MIDI and so I can easily adjust the velocity of each hit, and programme that hats in where they feel right.
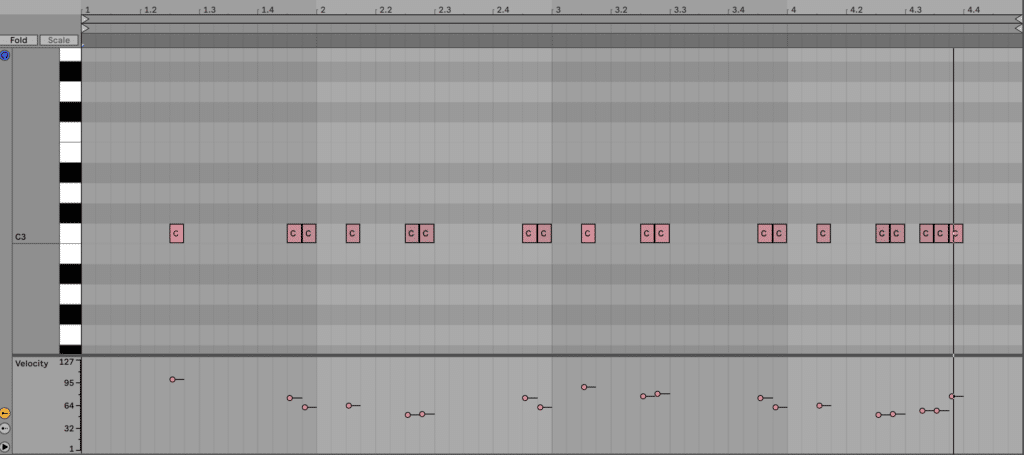
Now we have a solid 4 bar loop of drums. Notice how the loop feels less static and more interesting to listen to? That's the power of that second hat!
Let'southward duplicate this loop once to viii bars for the next step – creating a fatty bassline.
Footstep #3: A Huge Bassline For The Drop
Although dubstep is known for its crazy bass variations and sounds, virtually tracks feature ane master sound that carries most of the song.
Typically, this is a bassline with enough midrange frequencies to be heard on whatsoever system.
This is true of the archetype dubstep track Bass Cannon past Flux Pavillion (one of my all-fourth dimension favourites):
The Bass-ic Sound
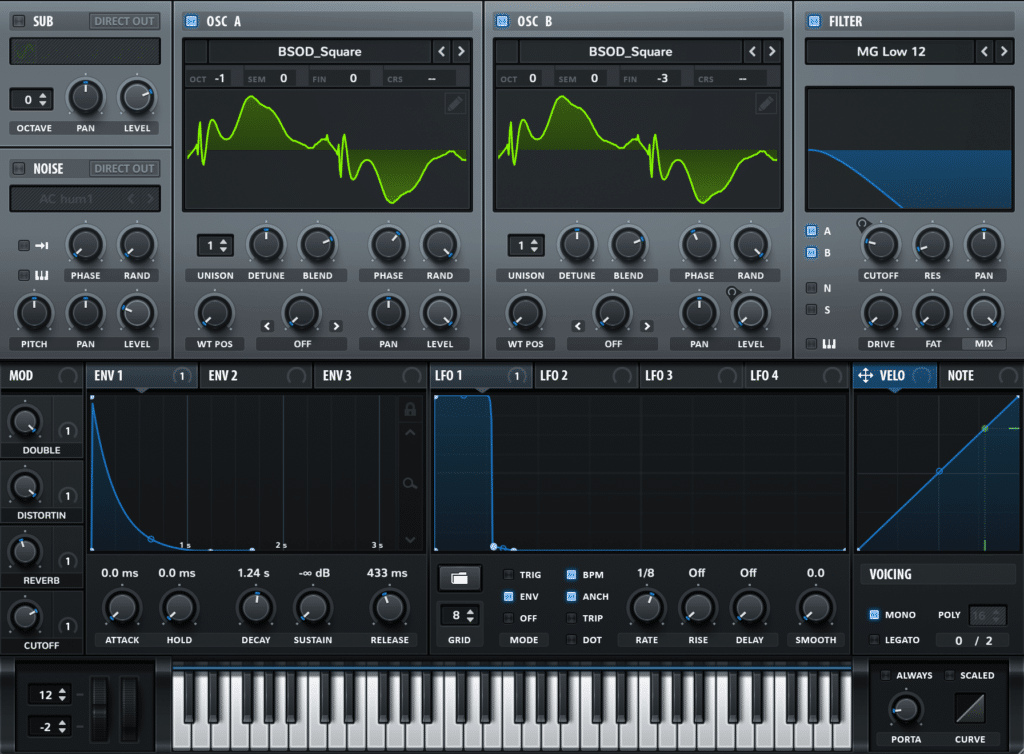
For the track we're working on, I'm going to design the sound from scratch (since sound design is integral to dubstep).
If yous'd adopt, yous tin can take hold of this preset within the EDM Starter Kit (BS Neo Deep Bass). Presets are a nifty tool to use if you adopt not to dive into sound design.
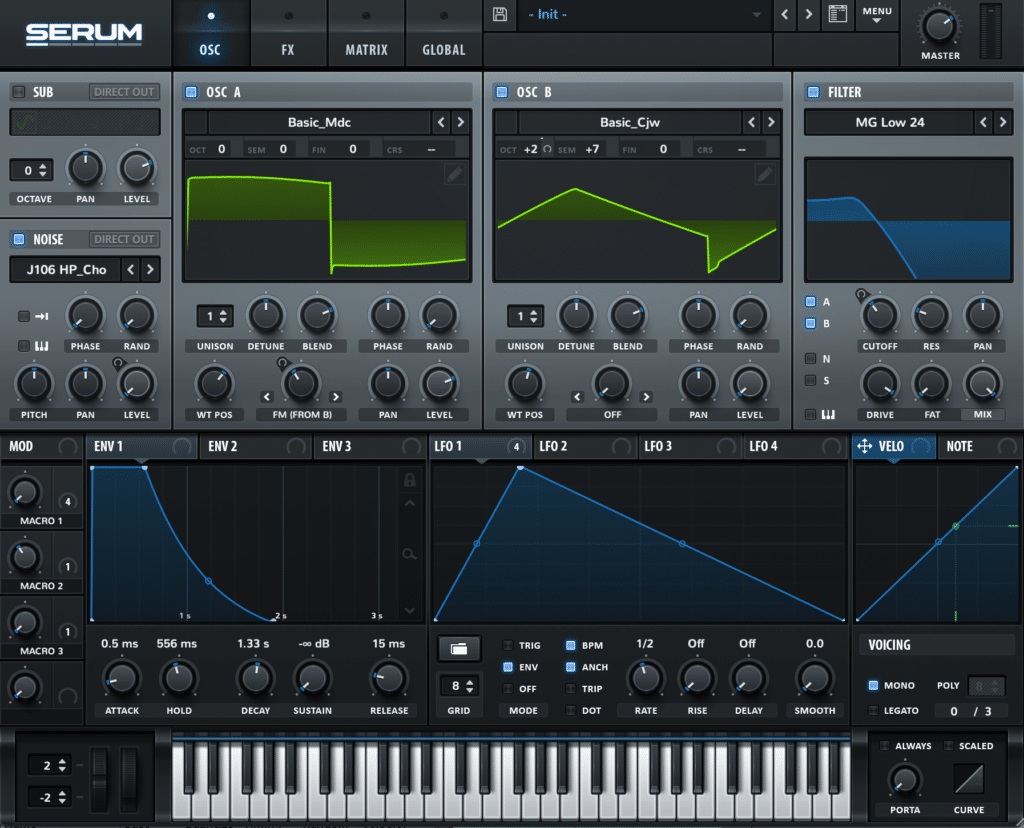
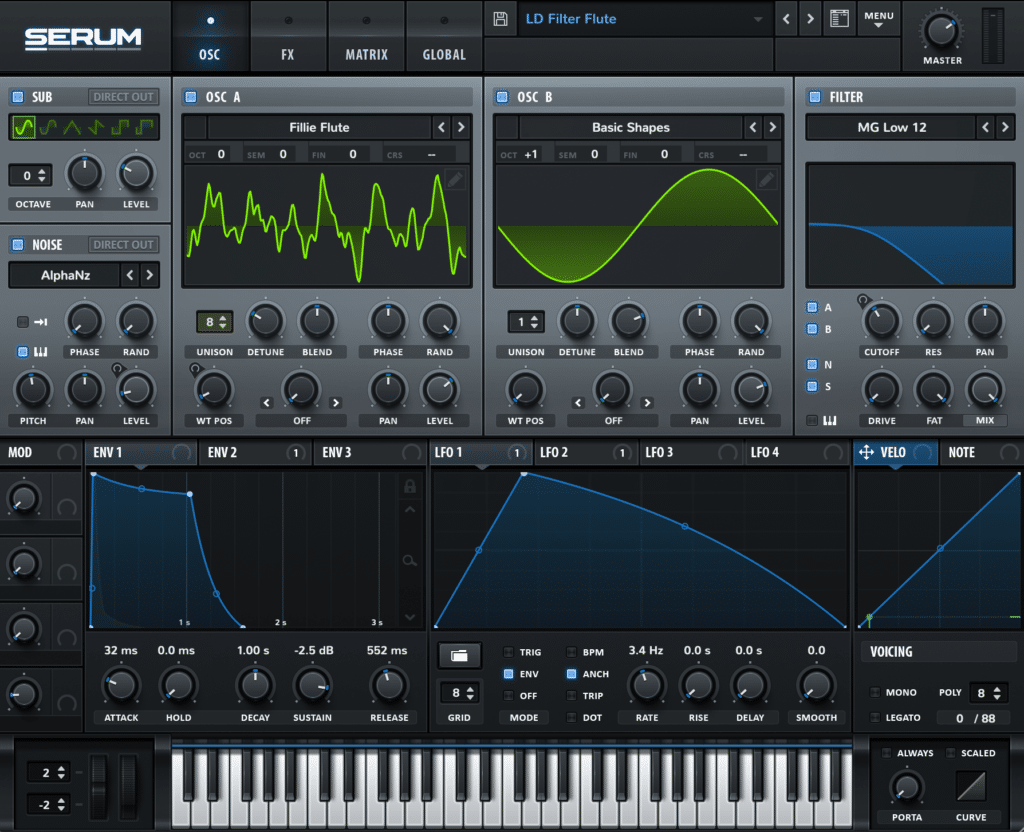
Allow's apply Serum to create this. I'thousand going to load upward an initial preset:
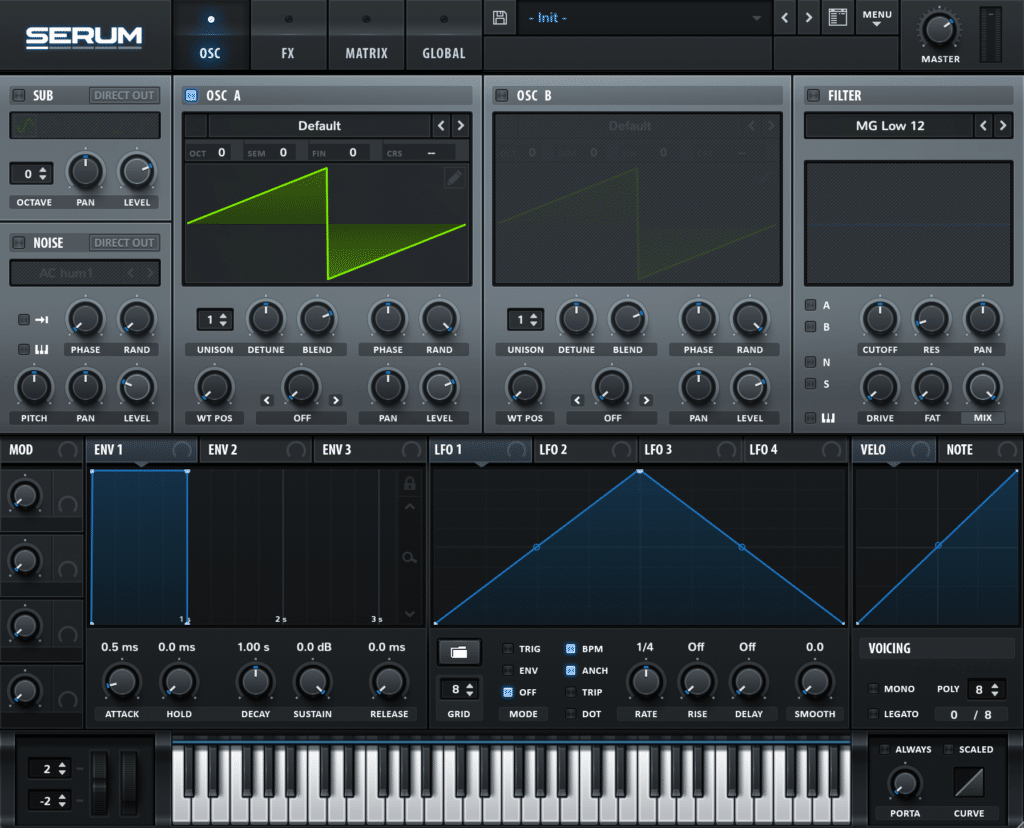
I'thou not going to cover the entire process in-depth, and so here's a summary of how I made this audio. Yous can tweak any of these to your own preferences:
- OSC A: Basic_Mdc wavetable, WT POS at 166, FM from B at 38%
- OSC B (for FM): Basic_Cjw wavetable, WT POS at 143, +two octaves & +seven semitones, level turned downward
- Noise: J106 HP Chorus
- Filter: MG Low 24, Cutoff at 150Hz, OSC A + B on
- ENV 1:
- LFO 1: Custom shape, mapped to Dissonance Level, FM from B, Filter cutoff & Baloney Drive
- FX:
By the end, it should sound (and look) something similar this:
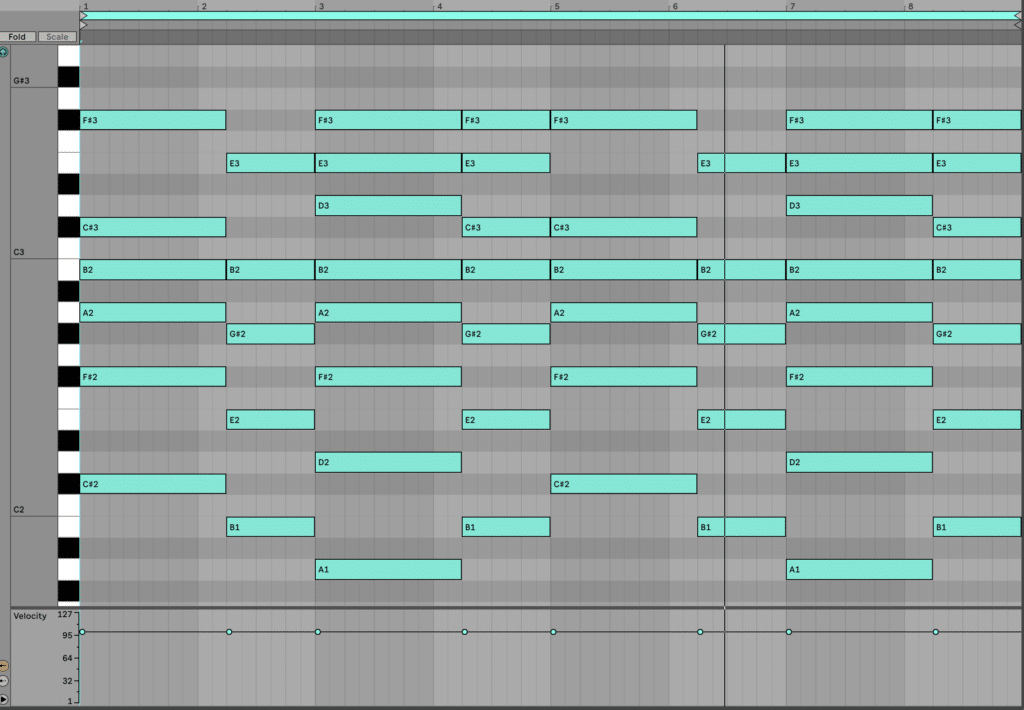
The All-time Bass Notes To Use
At present that the sound design is out of the manner, we can showtime programming in our bassline notes. The notation range is quite important, every bit dubstep is designed for club play.
Seriously – when I first learned to plan basslines, I idea all the sounds I was using sucked. Turned out I had just written them all an octave besides high. So it pays to get this right.
You lot tin either follow forth exactly here or write your own bassline.
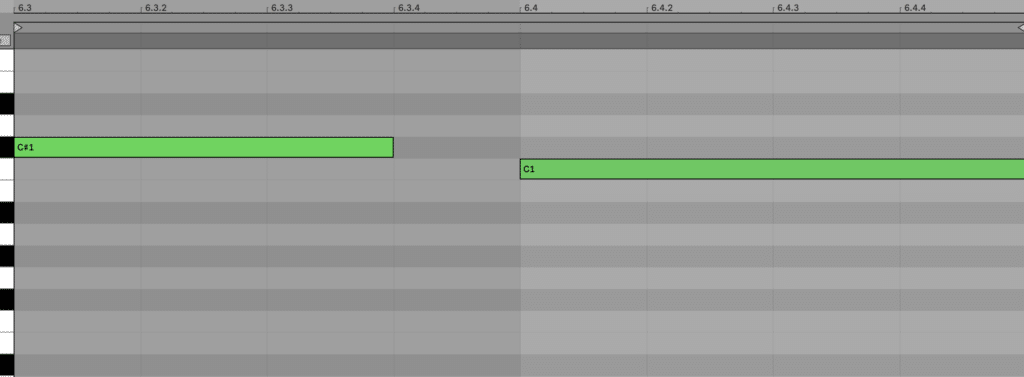
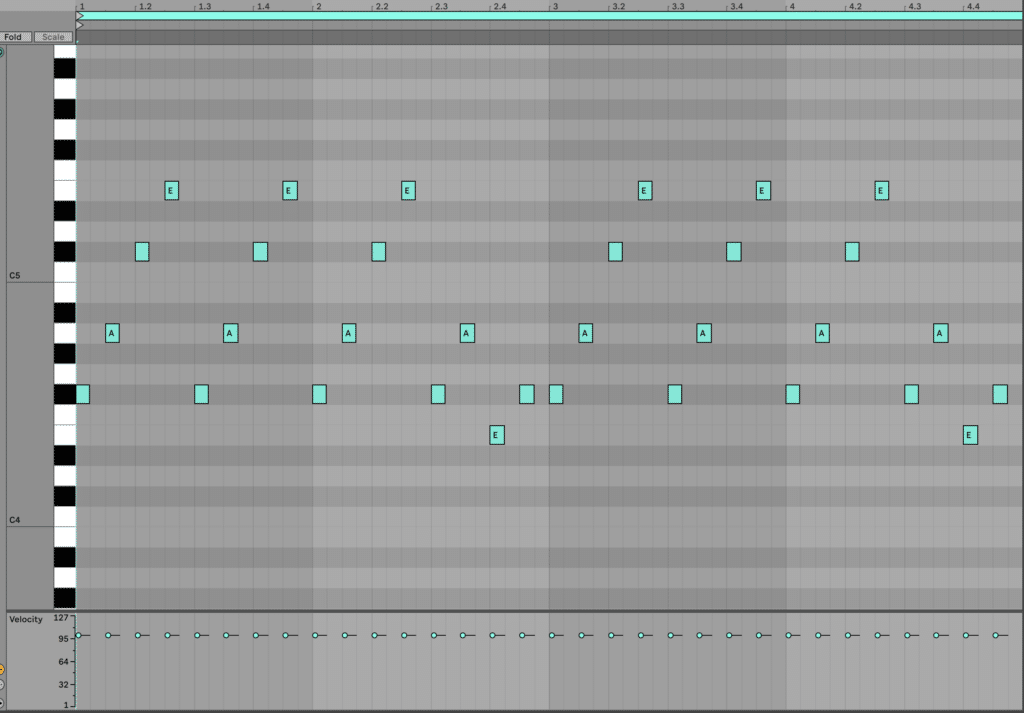
Let's outset with the root note of our key, F# Minor. I'll use F#0.
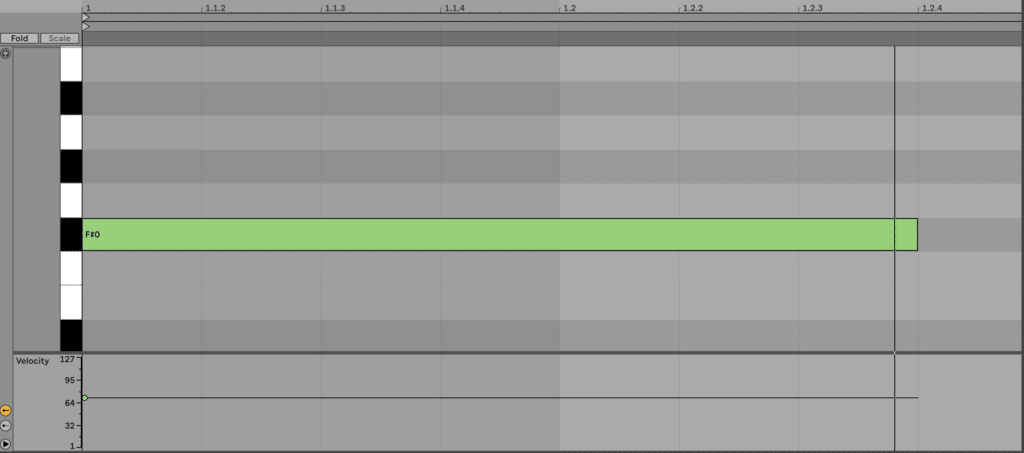
I'll play with the rhythm so it hits on the 1 for a bit, and so on the 2nd bar, I'll exercise a piddling scale run-upward to A0.
Next, I'll become dorsum downwardly only borrow a note from the Ionian manner (F0 instead of E0). This gives it a darker feel.
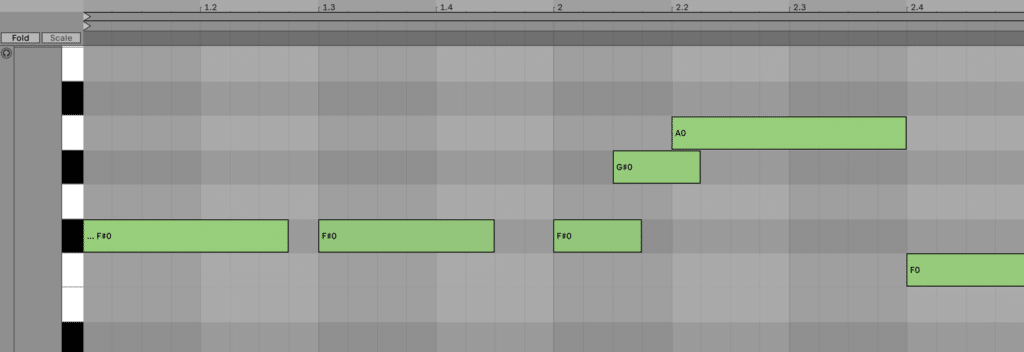
Lastly, I'll duplicate this all and make some subtle changes to the 2d repeat. This is known as 'call & response', and information technology's great for making your song more interesting.
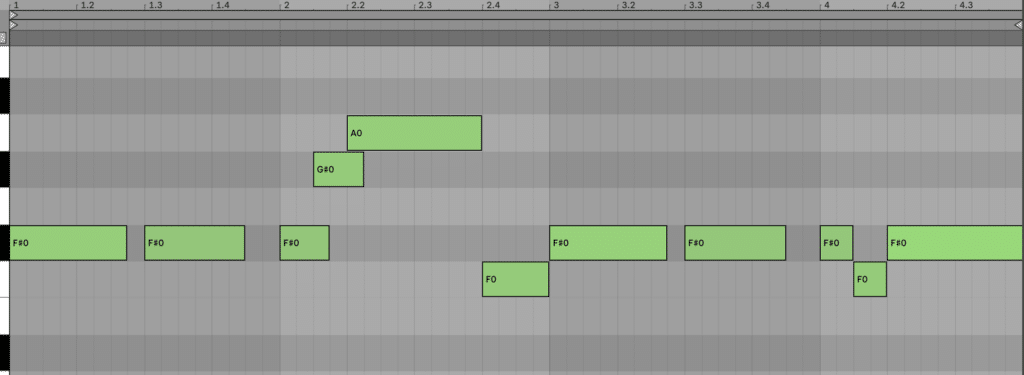
This is starting to shape upward to a solid bassline.
Just our last step is to add some movement with our macros set up in the preset. Macro one controls the baloney amount, whereas Macro 2 scales the filter cutoff. If yous've designed the audio from scratch, bank check the preset version to get the mappings.
I'm not going to suggest a item pattern here, but here's what worked in my rail:
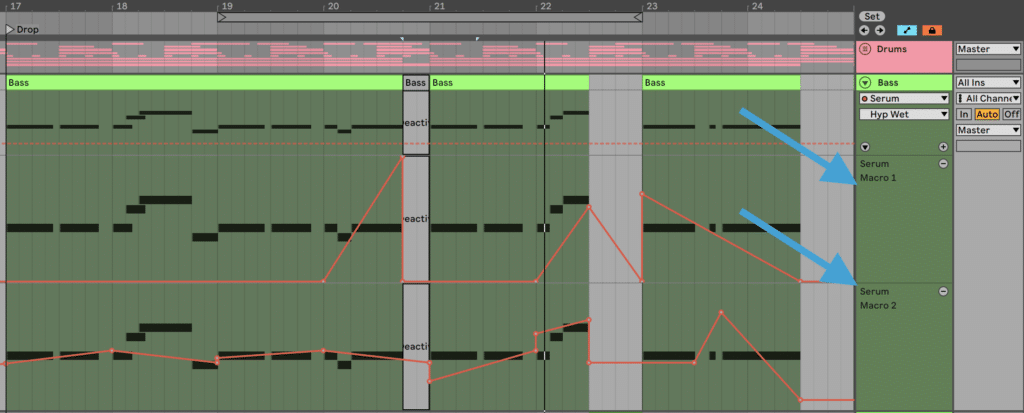
The distortion increasing towards the end of the first four confined creates a lot of tension. Plus the slight movements in filter cutoff adds organic movement.
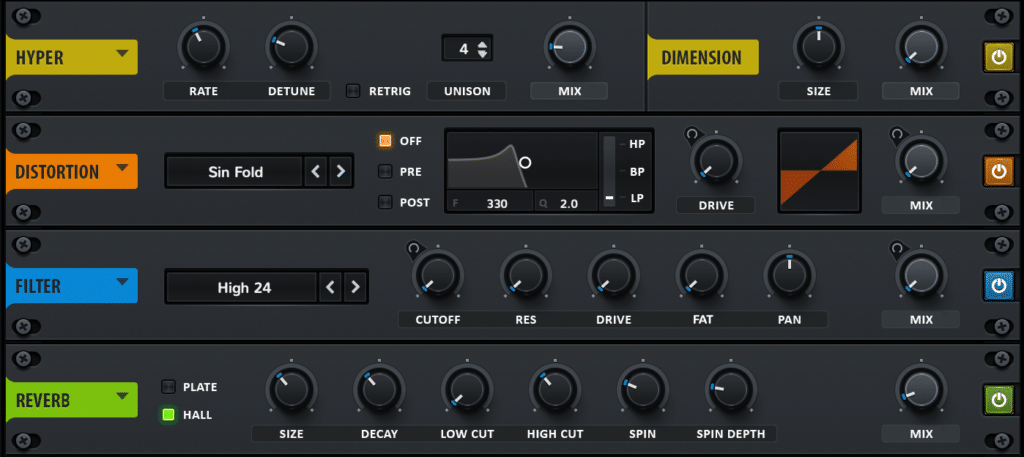
Post-Processing – Bring The Sound To Life
Adding FX to sounds across the synth you design them can bring life and season to otherwise generic sounds.
In fact, once I started post-processing my bass sounds properly, information technology took my production game up another level.
And if you look at all the pros, they use post-processing on pretty much everything.
Right at present our audio is expert but pretty elementary. We tin can mail service-process it a bit more to add more grit and body to information technology.
Here'south the concatenation I ended up using. Let's become through each of these effects one-by-one to explain the reasoning behind each:
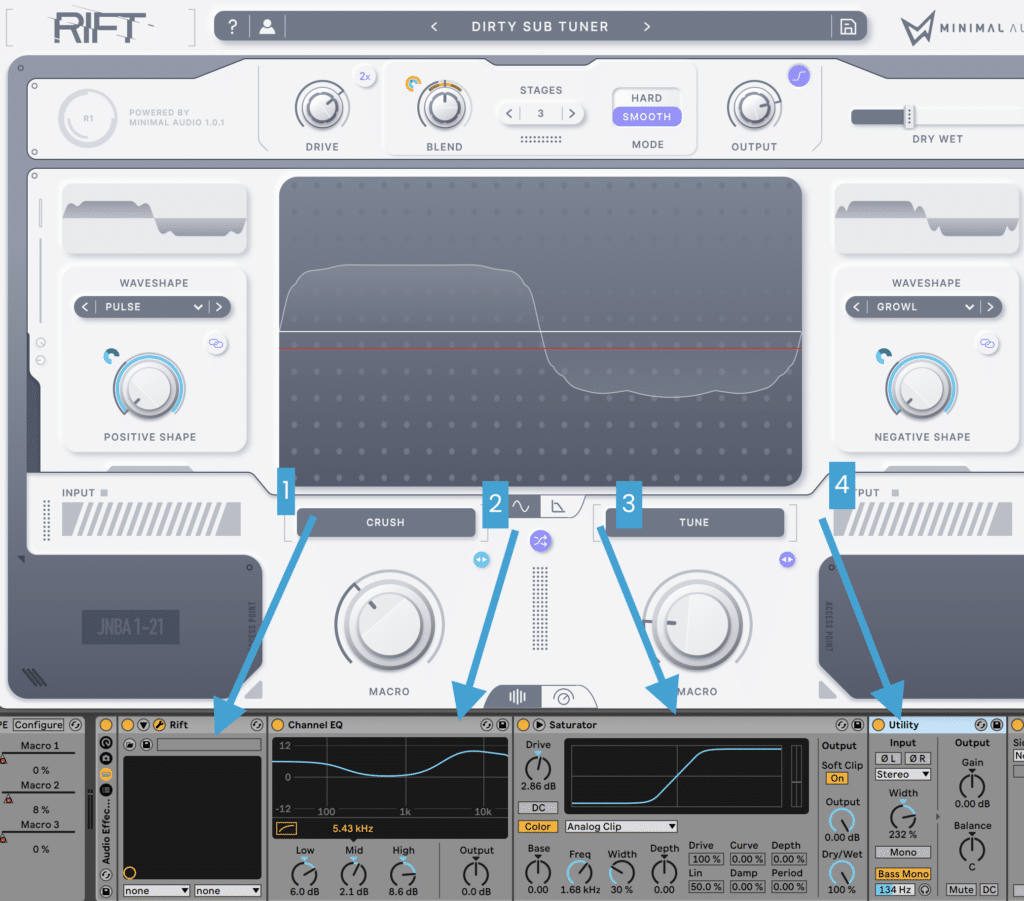
- Minimal Audio Rift: This is a baloney plugin with lots of features. Since distortion can add unique characteristics to sounds, I tried a bunch of presets until I stumbled upon something I liked. Then I tweaked the settings to taste.
- Ableton Channel EQ: A uncomplicated EQ to boost the lows and highs of the sound to add more energy. Non super technical or overcomplicated, and sounds skillful.
- Ableton Saturator: A trivial more than unproblematic distortion to warm upwardly the sound a little more after the EQ boost. The bass sounds quite nice later this.
- Ableton Utility: Both Serum and Rift add a little stereo data to this bass sound. So I wanted to bring it out more with the Width knob, as well equally command my low-cease past using Bass Mono switch.
Post-processing, similar any attribute of sound design, involves balancing experimentation with intentional decisions. So any y'all do here, don't overprocess and ruin your sound.
Here's what information technology's sounding like now:
Much more fat!
After processing the bass, let's blend the volume with our drums and move on to the next step.
Want to dive more into sound blueprint? Check out our Breakthrough Sound Design course.
Step #4: Bass Variations & Other Drib Sounds
Now we tin can flesh out our drop with a few more sounds. As nice equally the master bass is, on its own, it will get a little erstwhile.
Growl Bass Make full
This bass audio will provide a bit of surprise and excitement throughout the drop, giving listeners a reason to go along paying attending.
Permit's load up BS Solid Growl from the EDM Starter Kit:
We'll place this sound on the concluding ii beats of every third bar. I'll programme in two notes merely like this:
Now our drop should be sounding like this:

Spoken Vocal Cut
Adding in niggling vocal phrases or words tin bring a new level of energy to your drop, likewise as create moments of tension in between your bass sounds.
In this instance, I'g going to commission you to find your own favourite vocal sample and play around with it.
I personally constitute a 'yeah' sample and have placed information technology on the terminal beat of the second bar (every iv bars).
As you can hear, the delayed result gives it a cool metallic texture, making information technology fit right in with that other bass make full we just added.
Here it is in context:
Other dubstep tracks volition comprise fifty-fifty more bass sounds with lots of modulation. Simply for the sake of this build, we'll go on things uncomplicated.
If you want to make things more than complex, cheque out this video from Kermode.
Now that our driblet is taking shape, allow's turn to our other main elements.
Step #five: Melodic Synths For The Intro Hook
In dubstep, the drib tends to strip everything back to bass and drums. But the intros and breakdowns can feature anything from synths, to melodic samples, and to atmospheric effects.
In this case, I want to use some synths to create a euphoric intro and build. So let's movement our driblet to bar 17, and load upwards three instances of Serum so nosotros can create:
- An arp
- Some chords
- A lead melody
We won't layer these with the drop, as it will be for a different section.
The Arp
I'll starting time with the arp because it'southward an easy win, and information technology stays pretty consistent.
From the initial Serum preset, but load up the 'PL Bit Fun' preset from the EDM Starter Kit. Or you can design your own audio.
Permit'south likewise plan in some MIDI. I'one thousand going to program in an arpeggiated F#m7 chord (with a few changes):
At present we won't merely leave it here – we're going to employ an arpeggiator device, which is a great tool for creating nice melodic patterns.
In this case, we desire each note to add an 'octave trill' effect, where the sound moves up an octave at a i/32nd interval after the initial note.
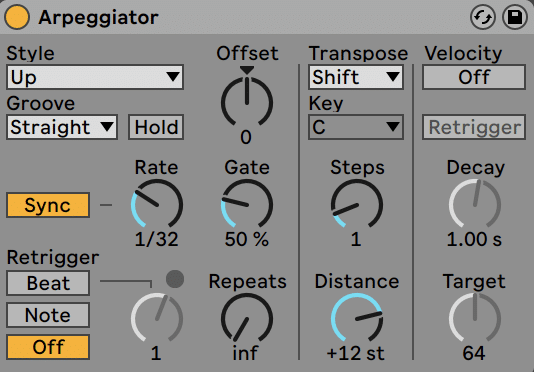
Now this sounds very 'chiptune' – perfect for grabbing attention and building energy in our intro.
(Want to get even more than artistic with arps? Check out some avant-garde tips below on our YouTube channel!)
The Chord Synth
The chords here will create the euphoric feeling in the build-up.
Again just download it from our EDM Starter Kit (CHD Driblet Supersaw – Thin Layer):
In terms of mail service-processing, we simply desire to thicken it up with some chorus and overdrive. Here'due south what I added using Ableton Live'southward stock devices (you tin replace Pro-Q 3 with whatever stock EQ):
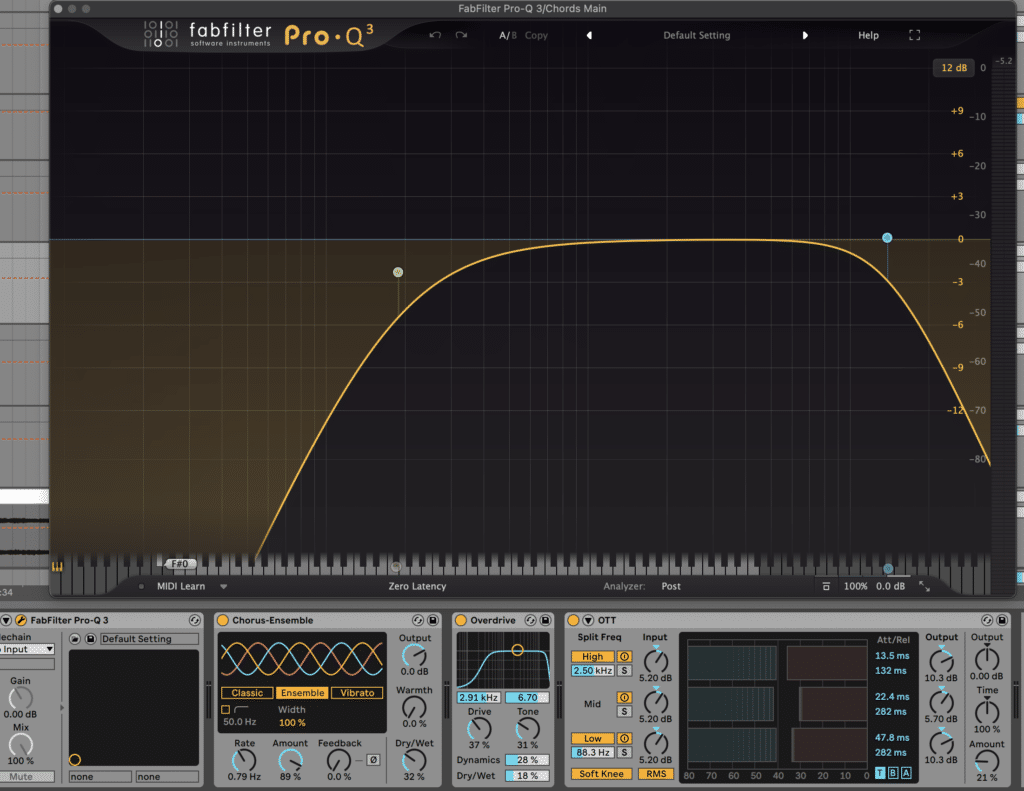
The overdrive subsequently the chorus amplifies the thickening result, giving it that huge feeling. And the OTT squashes it all together and brings out the highs.
Here'south the MIDI I have used – note that there are a lot of doubled notes (aforementioned note upwardly the octave) to create a full audio.
Feel free to copy it (it'due south good practice)!
To make this even bigger though, I'1000 going to duplicate the whole channel and create a second layer.
Here's what I did to thicken out the supersaw:
- Pitched the MIDI up an octave
- Added the 'Brilliant White' noise in Serum (great for adding energy)
- Changed the chorus effect to alter the sound (everything sounding the same doesn't layer well)
- Removed OTT to let it breathe
Hither's what it sounds like blended with the original chords:
Much bigger! At present let'southward add the lead over the top.
The Pb Synth
This one was actually a synth preset we employ inside our course EDM Foundations, but for you guys, nosotros've included information technology in the EDM Starter Kit. Information technology's called LD Filter Flute.
I'm actually going to start with the bassline MIDI for the lead synth in a higher register. This ties the drop and intro to each other in a dainty mode, while still leaving the heavy bass for the drop.
I'thou also going to layer it up the octave with a lower velocity. This is a killer trick to go your leads to cut through the mix.
We'll leave it playing throughout the entire intro for at present, but later nosotros'll come back and requite it a proper system.
Lastly, here is the MIDI I've used. I used the bass pattern up a few octaves, as it'southward loosely related to the chord synth, just with its own rhythm to separate it out.
Once more, you tin can copy it exactly, or add your own twist:
The second repeat upward the octave helps to increase energy towards the drop.
And now that we've got a bones melodic intro, we can plow to doing a proper arrangement.
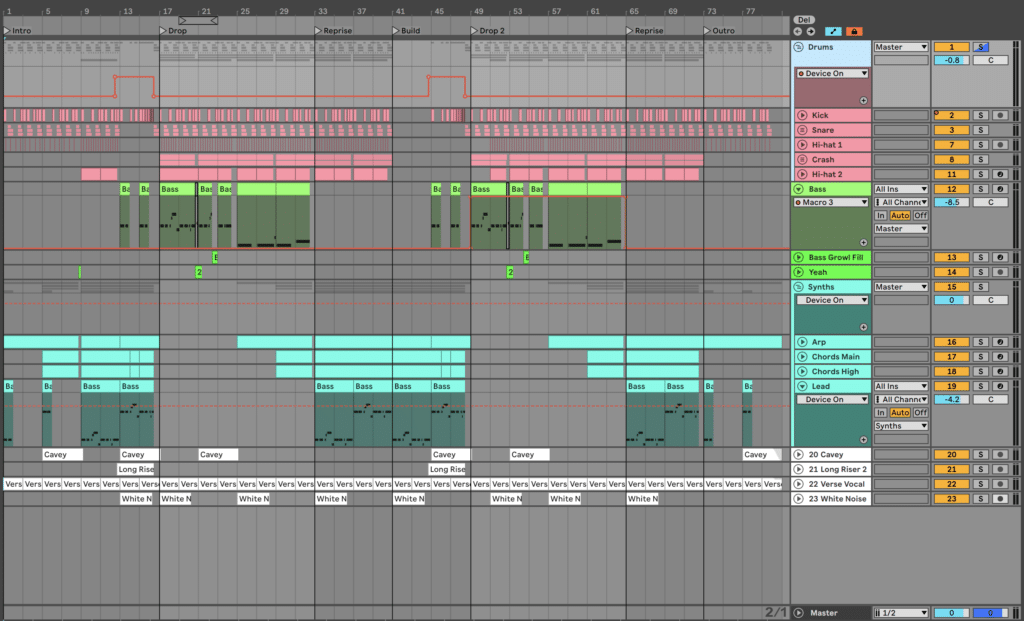
Stride #vi: Arranging A Strong Intro, Build & Drib
Now we can actually showtime to transform this thought into a total runway. This is where we create unique sections, add together interesting fills and bring in groundwork FX.
For the purposes of this article, we'll be using a more than uncomplicated structure. But you tin take this and change as much equally you want!
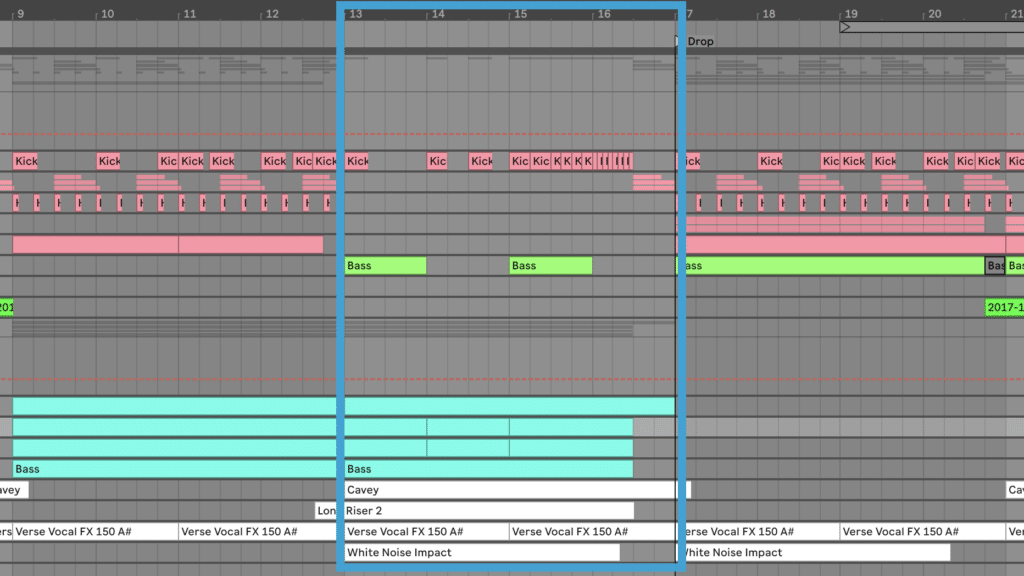
Intro (First 12 bars)
The purpose of the intro is to hook the listener in with something interesting.
Hither's what I'm going to do to our intro – y'all tin experience free to borrow any of these techniques:
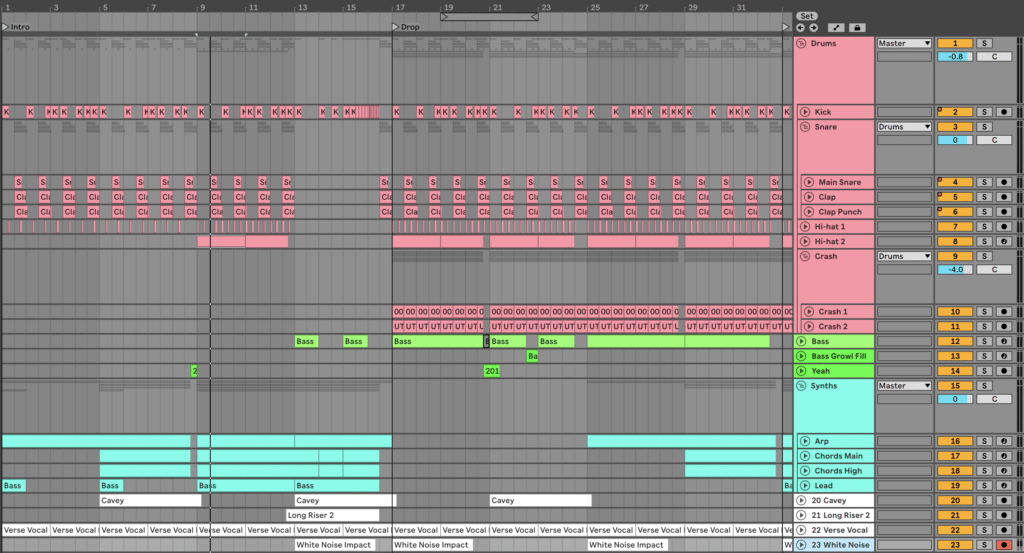
- Put the Howdy-chapeau 1 on the off beat but for the starting time 8 confined
- Introduce Hi-hat 2 at bar nine, but for a bit until taking information technology out at bar thirteen
- Bring the full Hello-lid 1 at the aforementioned time
- Place the 'Yeah' sample correct before Bar 9
- Place the first bar (two notes) of the Atomic number 82 synth blueprint just, every four bars
- Automate the filter cutoff of the Arp upwards over the first 8 bars
- Innovate the Chords filtering up at bar five, fully coming in at bar 9
These changes are designed to slowly introduce and tease the master idea, without playing all the cards from the start of the song. Then the master idea hits with full impact.
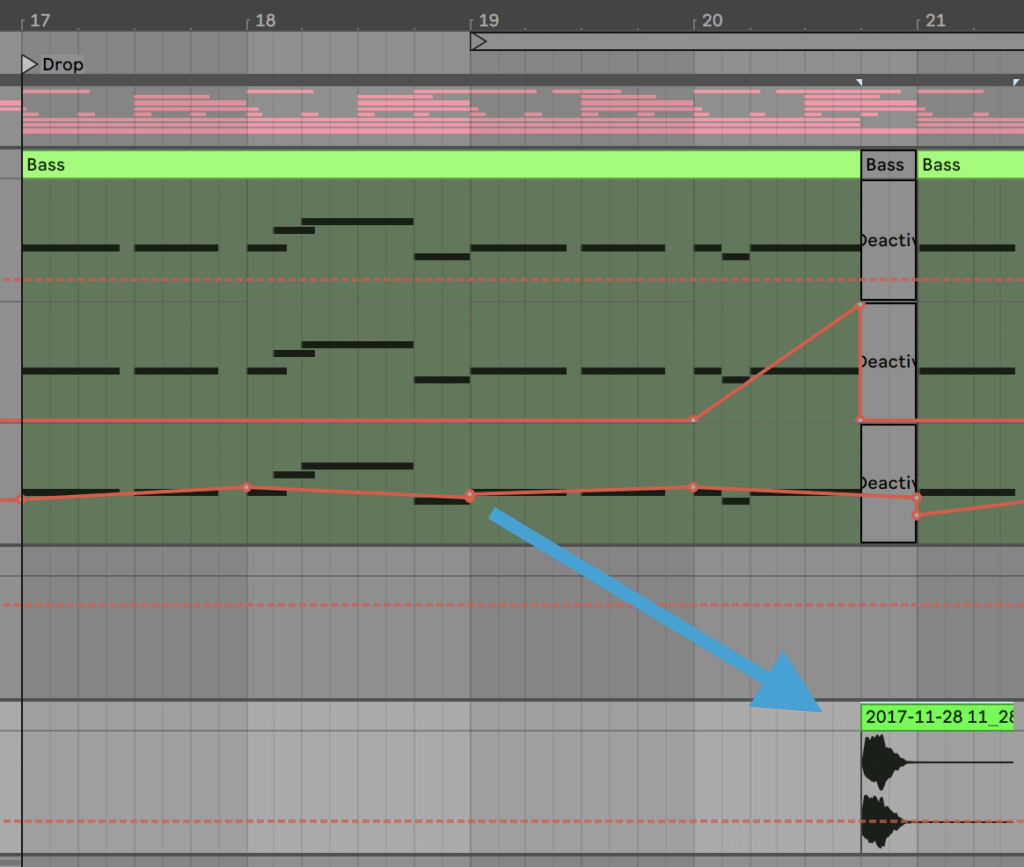
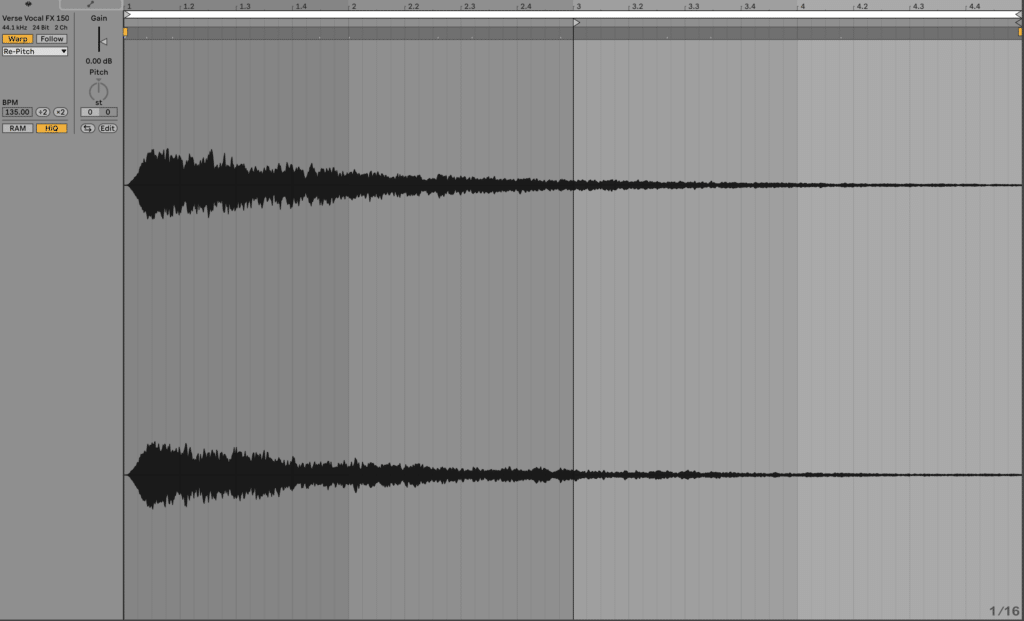
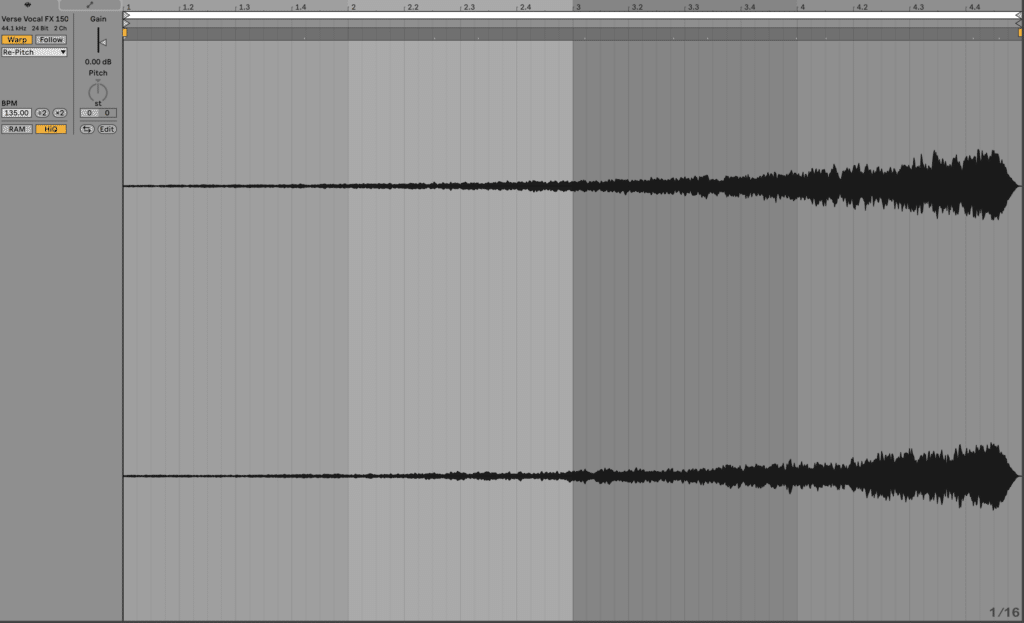
I've also brought in the 'Verse Vocal FX 150 A#' sample from the EDM Starter Kit. I've warped this in time using Ableton'south Repitch mode, which happens to transpose our sample into our key.
I've and then started the sample at bar 3 and reversed the outset one, to create a absurd alternating effect.
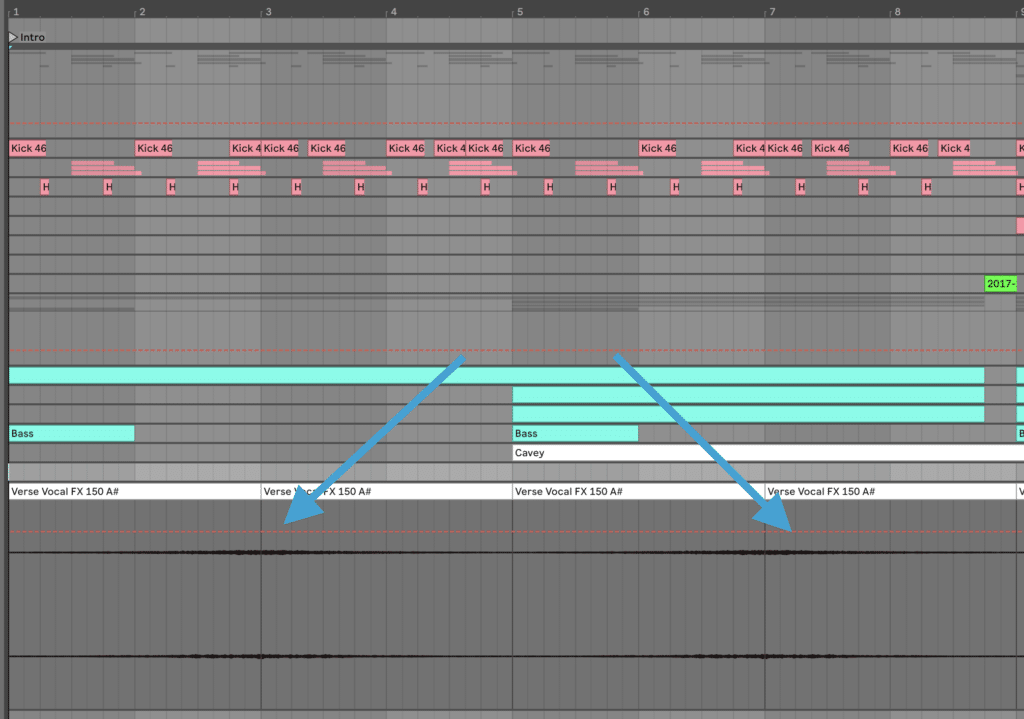
This sound pretty much repeats every 4 bars for the duration of the track, including in the build.
Here's what the intro will sound similar!
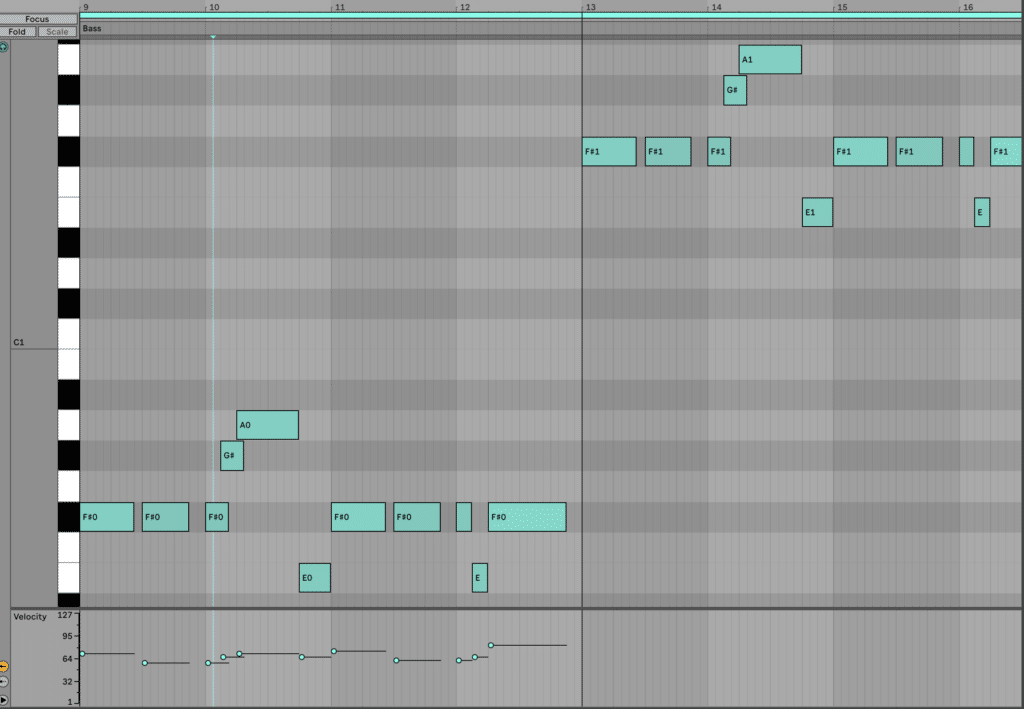
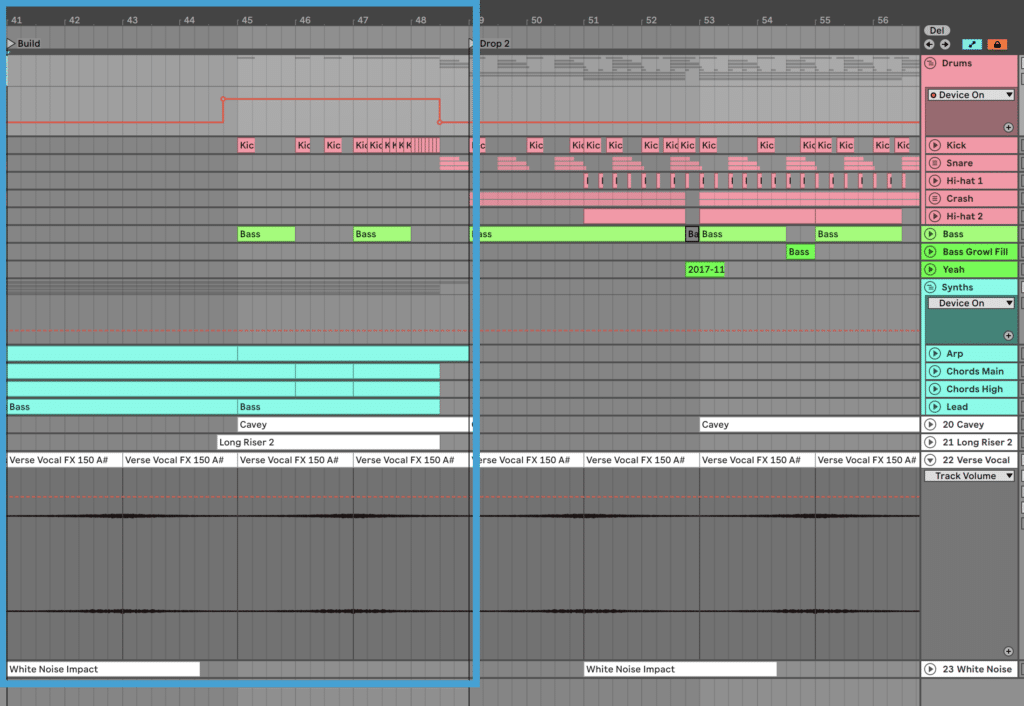
Build (4 confined)
Now that your musical idea has been introduced (and you've created interest in the intro), you can outset to transition up to the drop past using a combination of techniques.
In this particular style, I'm transitioning from a musical idea to more than of a bassline-driven idea, so what I practise at this moment is crucial:
- Remove Claps and Snares except the ane correct before the drop
- Innovate 1 bar of the Main Bass sound with a filter automating up
- Bring in the Long Riser 2 sample from the EDM Starter Kit, and accept it sweep up until 2 beats before the drop
- Place the White Racket Impact sample on bar 13 (from the EDM Starter Kit)
- Place the Cavey sample on bar 13 (from the EDM Starter Kit)
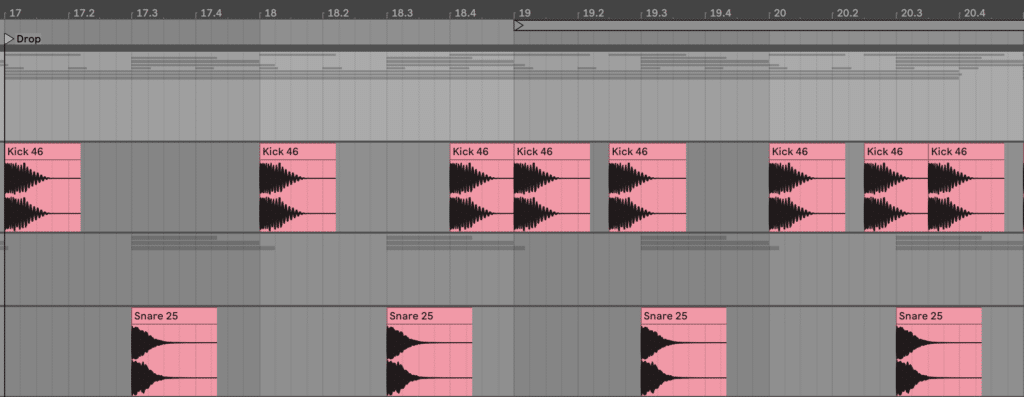
- Have the Boot double in rhythm right up until the drop
All of these techniques are tried and truthful build-up techniques in dubstep, and they piece of work for a reason. You don't always accept to use all of them, and there are times to try something new. But building free energy this way is guaranteed to create an impactful drop.
Driblet (8 bars)
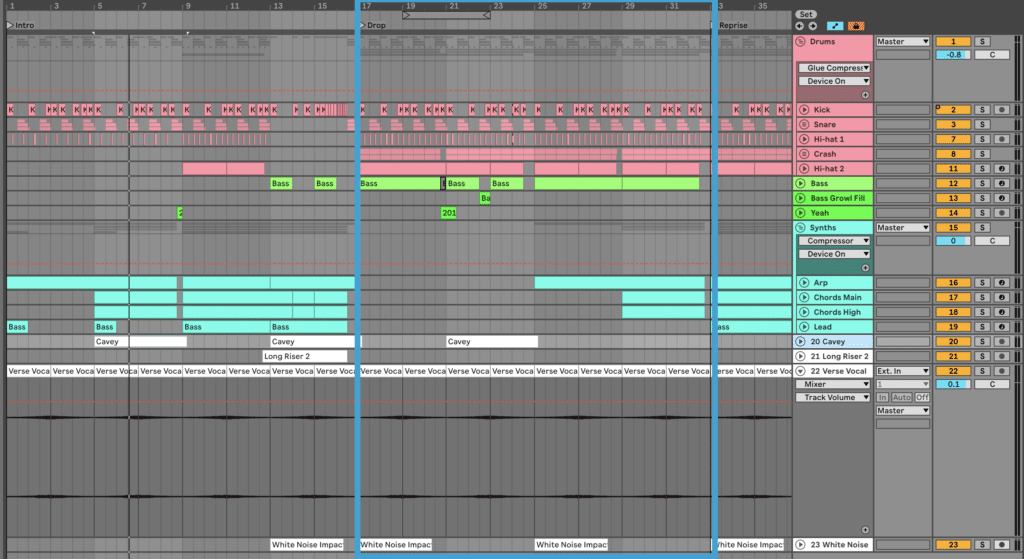
This is where the bass comes in properly, and where all the tension is released
- Remove all synths except bass
- Full drums with all hats
- Bring in crashes (cutting out at 20.four and 28.4 to leave infinite for 'Yeah' sample)
- 'Yeah' sample right before bar 21
- Bring Hi-chapeau 1 and ii out at 24.2 to give them a break
We're going to as well create a different 2nd half of the drop, to introduce the Arp and other melodic elements.
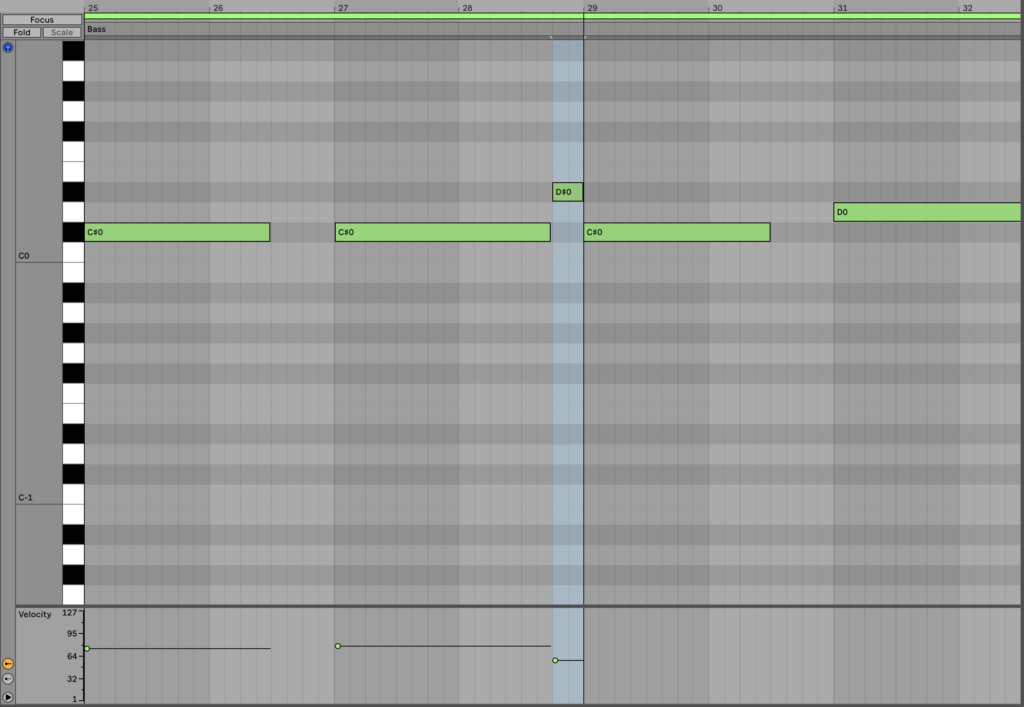
The first thing we'll practise is make the bassline more unproblematic to leave infinite for the other elements. Here are the notes I've used, which are much lower:
After this, the arp comes back in with a low-pass filter engaged, that slowly opens up over time.
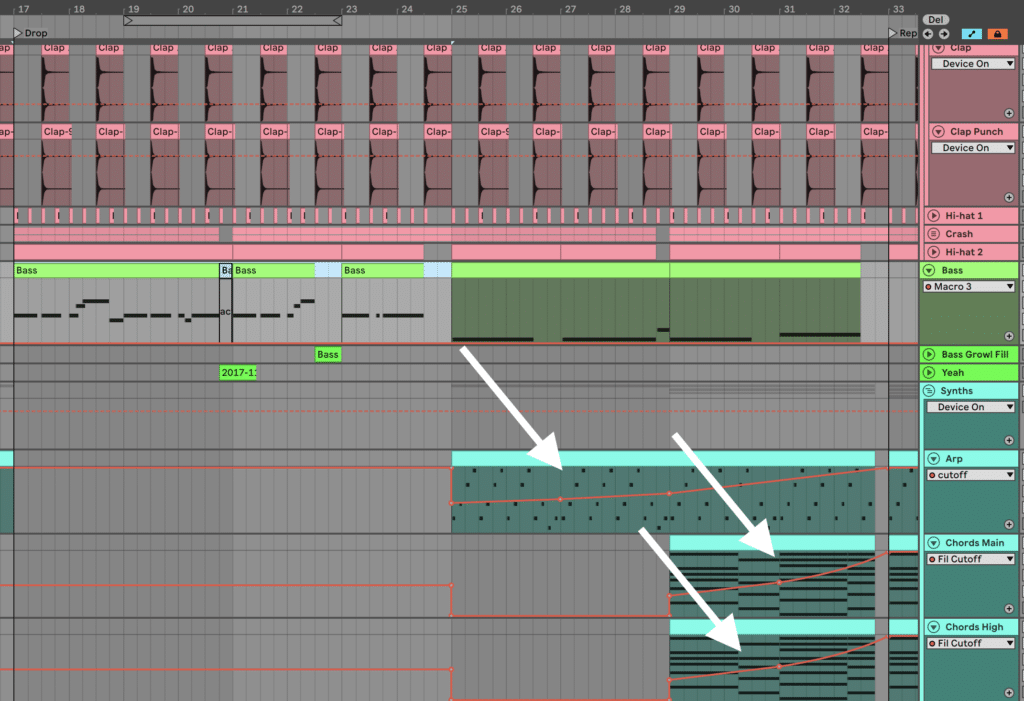
In the terminal four confined, both of the chord layers too come back in with a sweeping low-pass filter.
And hither's the total drib!
Now let's move onto the 2d half of the track.
Step #seven: The Mail-Driblet, Second Drop & Outro
In the second half of the track, we desire to be balancing repetition with a few new ideas. And then we won't be introducing besides many new elements.
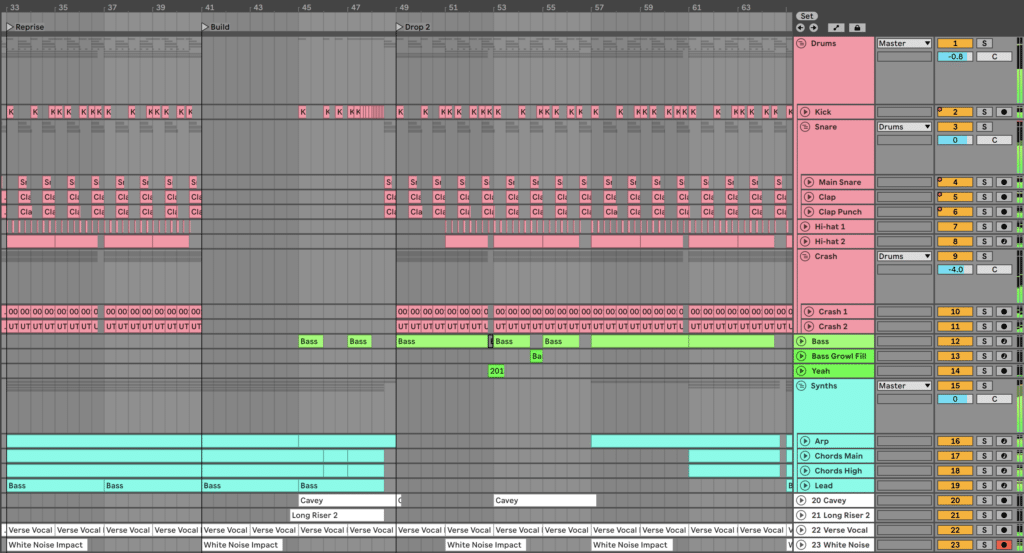
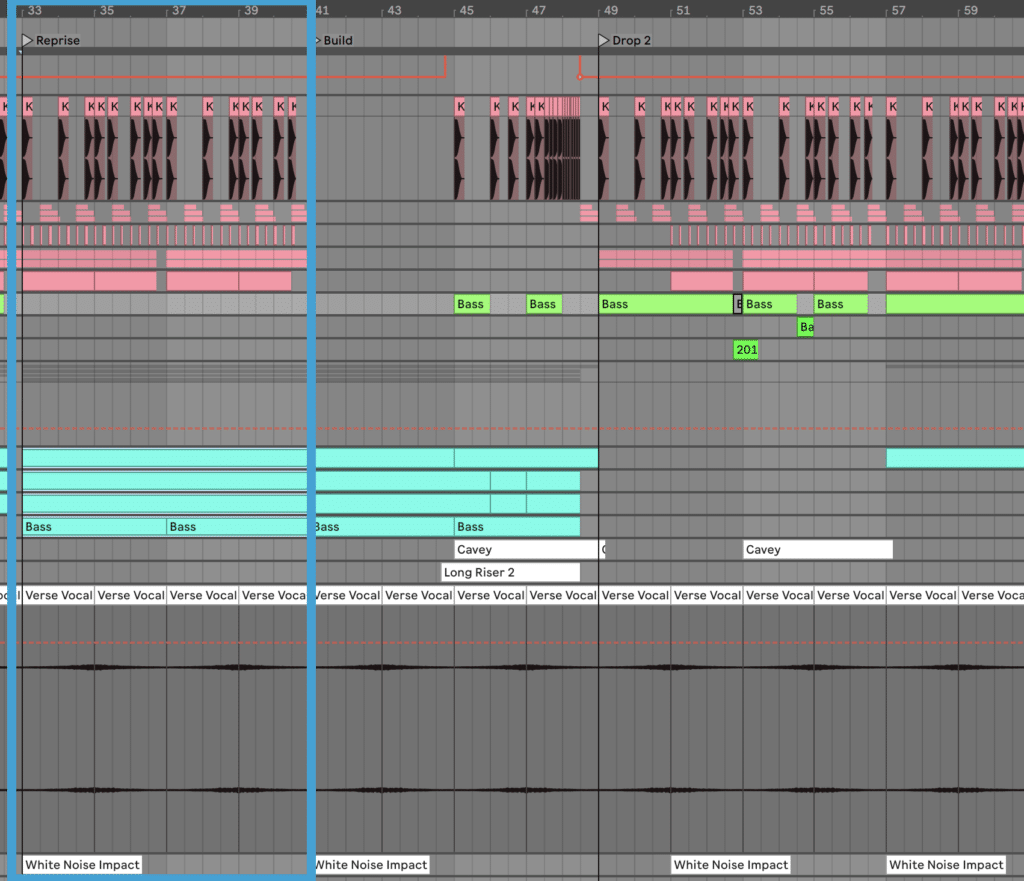
Reprise (8 Bars)
This section carries the same pulsate pattern but just copies the melodic elements from the original intro/build like so:
You tin can also bring the filter down on the chord synths towards the terminate of the section, to create some tension for the oncoming build. But the arp will stay pretty consistent so the energy is maintained.
Build (eight Bars)
This section is literally comprised of bars 9-16 copied, but without drums for the get-go 4 bars. Every bit I said, don't overcomplicate it 😉
Drop 2 (16 Bars)
Over again, start by copying the entirety of Drop i to where Drop 2 will be. However, nosotros'll exist changing up the Master Bass for this driblet.
I've automatic the octave on OSC 2 in Serum to become up by i via a Macro, which gives the bass a different harmonic texture:
Across this, I muted the kick and snare for the first 2 bars, too as removed both hi-hats. This creates an actress bit of tension during this department.
Lastly, I pitched the Bass Growl Fill up an octave to differentiate information technology from the offset drib.
Here's how it should audio:
Reprise & Outro (16 Bars)
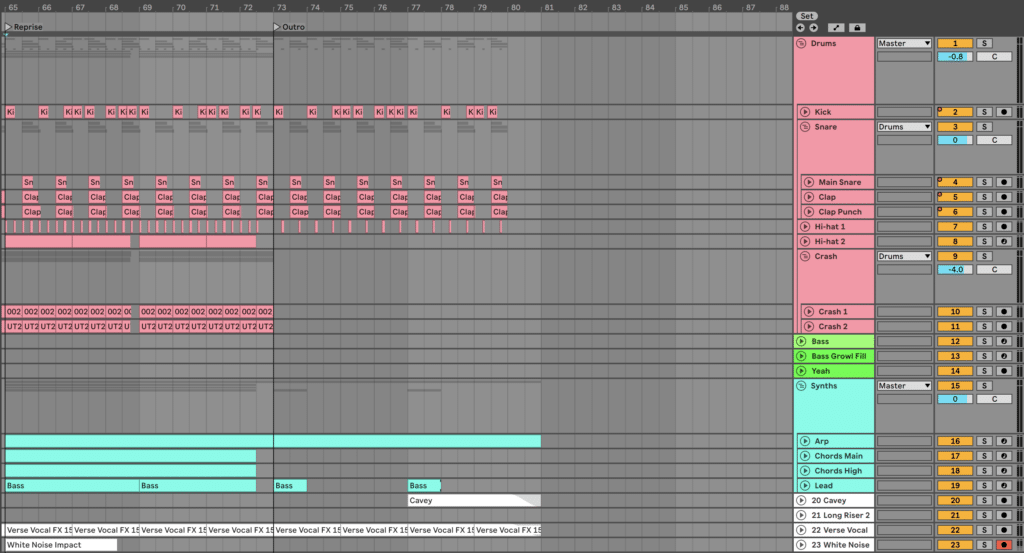
For the first 8 bars (the Reprise), y'all can just copy the previous one. And for the outro, re-create the get-go 8 confined of the intro, but:
- Remove the Chords
- Start the Arp with the filter open, and bring it downward towards the end
- Remove the last 1 bar of drums
And that's all you demand for a bones outro! With that done, our arrangement is looking finished, and nosotros tin can outset refining and mixing our rails.
Step #viii: Cleaning Upward – Mixing & Terminal Polishes
Now we're upwards to the dreaded mixing stage. The good news is that if you lot've produced your track well, mixing doesn't have to exist a chore.
Equally with all genres of electronic music, fourscore% of the mixing work happens in the fader balancing.
Considering fader balancing is like EQ for your whole mix – if you desire more low-end, turn up the boot and bass!
Hither are the fader levels I ended up at. The point here is not to copy me directly but to reach a similar relative residual.
You lot desire your kick, snare, melody, and bass to be at the forefront, and everything else to be supporting the mix at different levels:
Faders
- Kick: +0.3dB
- Main Snare: 0dB
- Clap: -3dB
- Clap Punch: +2.1dB
- Hi-hat ane: -vi.6dB
- Hi-hat 2: +0.2dB
- Crash GRP: -4dB
- Crash i: -fifteen.7dB
- Crash two: -10.7dB
- Main Bass: -8.5dB
- Bass Growl Fill: -3dB
- 'Aye' Sample: -four.8dB
- Synths GRP: 0dB
- Arp: -7.1dB
- Chords Main: -6.1dB
- Chords High: -7.4dB
- Lead: -iv.2dB
- Cavey FX: -eight.2dB
- Long Riser ii: -9dB
- Poesy Song FX: +0.1dB
- White Noise Impact: -21dB
EQ
Once you've got a good-sounding mix from balancing the faders, the next tool to use is EQ. EQ can solve imbalances in the sound that but adjusting the faders tin can't ready.
To demonstrate, hither are a few changes I made with EQ (I'll be using Fabfilter Pro-Q three, but you tin use stock EQ besides):
Bass Energy
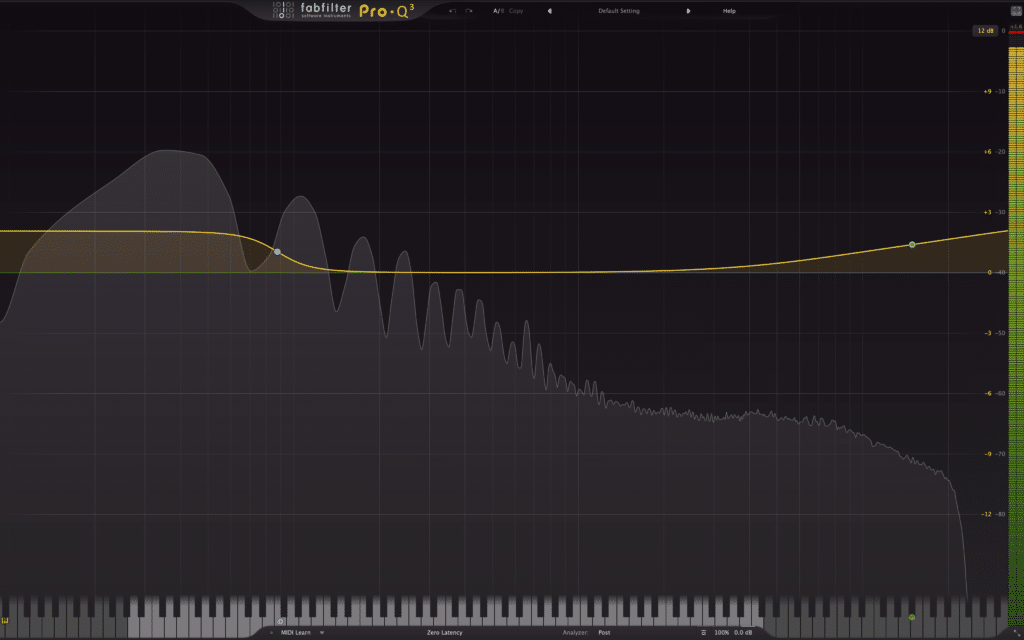
Even though I already boosted in the lows and highs in the bass, the baloney later tin frequently weaken our sub frequencies. Plus I felt it could do with a piddling more top-end.
In that location's a 2dB low shelf boost at 87Hz, which targets just the sub as nosotros're using a 48dB/oct slope. This gradient is very targeted, so neighboring frequencies won't exist besides affected.
Lastly, the high shelf is a gentle 3dB boost at 15kHz, to add more clarity to the bass.
Lead Clarity
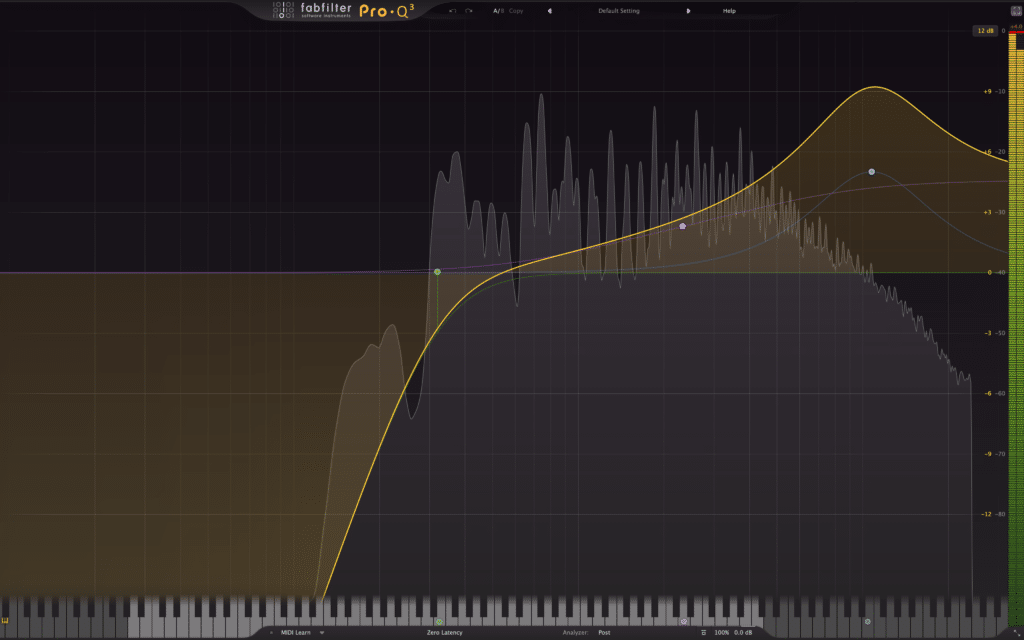
I admit this is a pretty drastic boost around viii-10kHz with a high-shelf and bell, but for this sound, it worked to assist it cut through the mix.
The high-laissez passer filter at 320Hz also helped to clean out low-end mud that conflicted with the chords too.
Etching The Arp
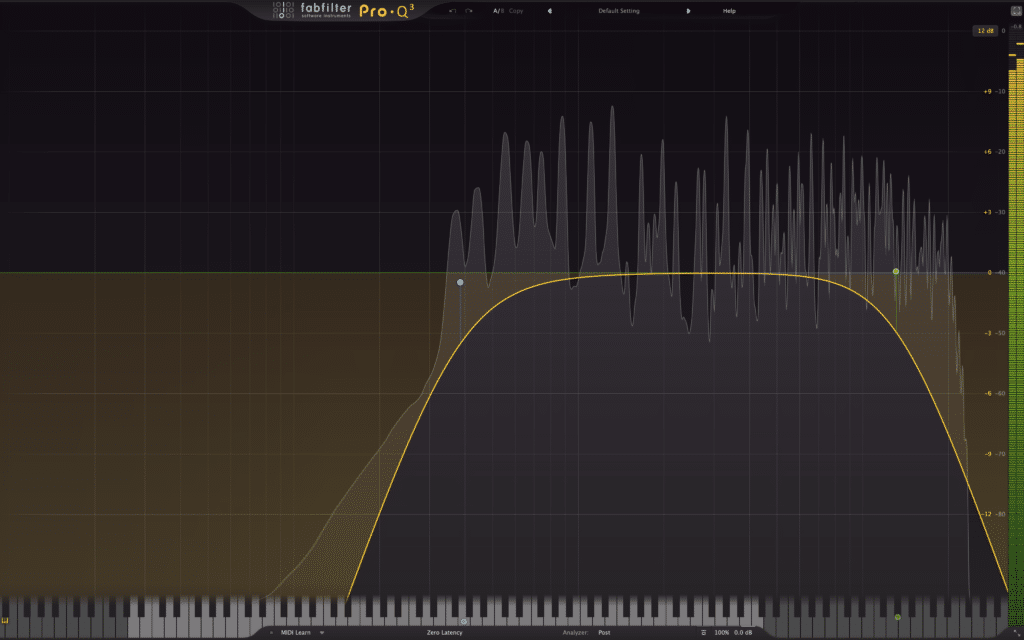
The arp sounds corking on information technology's own. But in the context of the track, the highs disharmonize with the pb also much, which is supposed to the main element. And then depression-passing it effectually 13kHz solves that issue.
Additionally, a high-pass at 380Hz gets rid of unnecessary low-finish that disharmonize with other melodic elements.
Compression
Compression can be overused in electronic music. Especially when the elements already have pretty flat dynamics.
But in this case, the 3 layers of the snare resulted in a pretty flat sound, so I needed to control it and add some dial back.
Here'south what settings I used on the Snare Group:
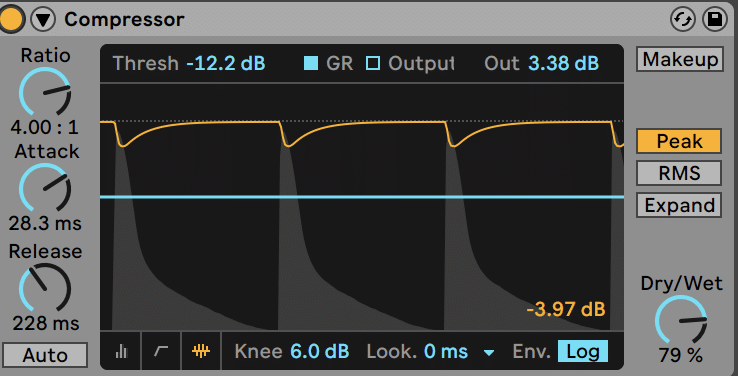
The longer attack yet lets the dial of the snare through, only nosotros're controlling the torso of the sound a lot more.
Hither's what it sounds like without and with the compressor engaged:
It'southward a subtle departure, just the second sounds a lot fuller to me.
Sidechain Pinch
In dubstep, sidechain compression is essential for 2 reasons:
- Balacning the depression end and avoiding mud
- Creating a pumping event with other instruments
For these reasons, I've added sidechain compression from both the kick and snare to the:
- Crash Group
- Principal Bass
- Synths Grouping
Here are the settings if you want to copy them exactly:

Drums Kiss
Lastly, to tighten up and gum all the drums together, I've used a chip of buss compression on the Drums Group.
I'thou using Ableton Live's Glue Compressor for this task, only any compressor tin practise:
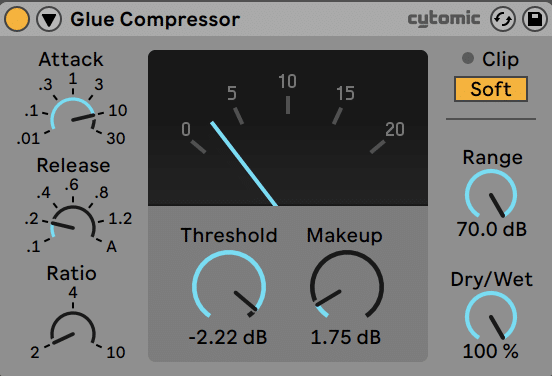
Here'due south a rundown of each parameter:
- 10ms attack for a piddling bit of dial, only communicable most of the peaks
- 200ms release for a natural yet fast pumping effect
- Ratio of 2:1 for a gentle sound
- Threshold adjusted to get 3dB of proceeds reduction
- Makeup gain to boost boilerplate volume dorsum to where it was
- Soft Clipping on to cut off whatsoever transients and add loudness
The soft clipping at the stop of Gum Compressor'south processing too provides some squeamish, loud drums in one case nosotros boost the makeup proceeds.
With the mixing done, now all that's left is the mastering!
Step #ix: Mastering for Maximum Loudness
We're going to keep mastering simple for this build, as it's just to become the dynamics level and make information technology sound ready for social club play.
I'm going to be using a limiter – FabFilter Pro-L ii to be exact.
Simply use the 'Modern' setting and bring the gain up to taste:
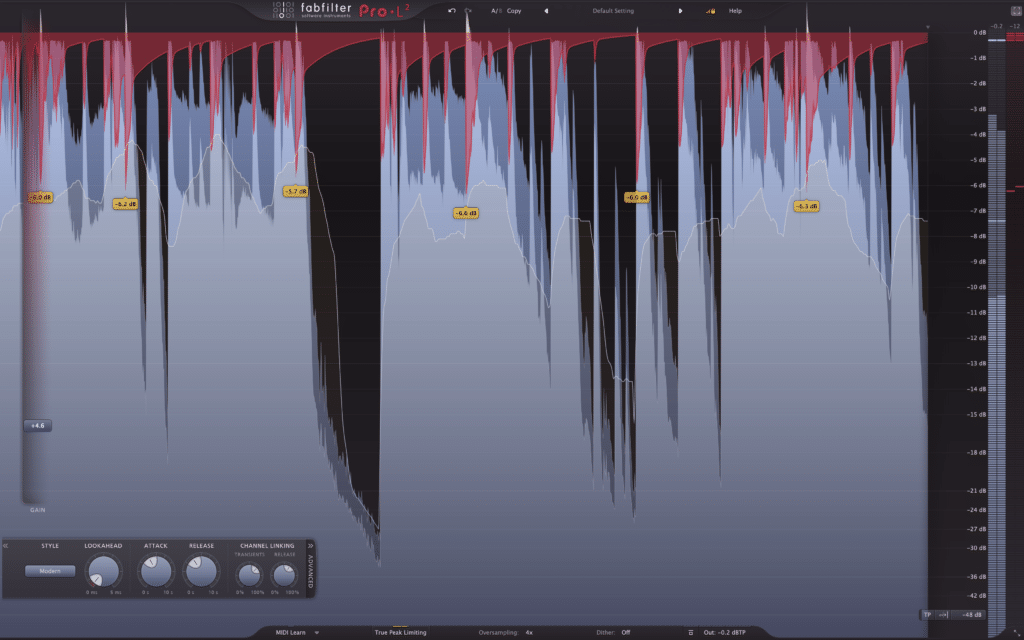
Yep! It's that simple (as long as you've mixed well in the final footstep).
At this stage, you lot can get further and add multiband pinch, saturation, and whatever else y'all desire to become that final polish. Just brand certain to add information technology before the limiter.
Only the limiter does ninety% of the heavy lifting anyway.
Hither's the final effect!
That's How To Brand Dubstep!
Phew – if you made it through all of that, great job. You've merely made a whole dubstep runway!
At this phase, you're welcome to make whichever tweaks yous like to make the song your own. Or better yet, apply this overall framework to create your own from scratch!
If you want to have your learning further as a producer, make sure to sign upwardly for our Free Masterclass which will help yous:
- focus on the right things as a producer
- accelerate your musical joruney (and then it takes months, non years to get good)
- give you all the resources you need
Did I miss something in this guide? Flick me an email at [electronic mail protected].
Lastly, bank check out a few of our other genre guides hither at EDMProd:
- How To Make Future Bass
- How to Make Firm Music
- How To Make Drum & Bass
- How To Make Lofi Hip-Hop
Source: https://www.edmprod.com/how-to-make-dubstep/
Posted by: rutledgepaus1952.blogspot.com
0 Response to "Does Ableton Compressor Add Makeup Gain"
Post a Comment